Payment Actions
The following sections provide step-by-step guidance for common payment tasks in ConcordLink. ConcordLink does not store credit or debit card numbers directly — it uses a tokenization process so that no confidential card details are ever accessed or stored by the system.
External agents with the Viewer role can view payment data but cannot process, modify, or reverse payments. Assign the Editor role to external agents who need to accept payments and manage payment methods. The payment and autopay screens are only accessible to users with Editor-level access or above — view-only users do not see payment entry or autopay setup options.
Viewing payment information
Viewing payment history
- Open the obligor's account.
- Navigate to the Payments or Account History tab.
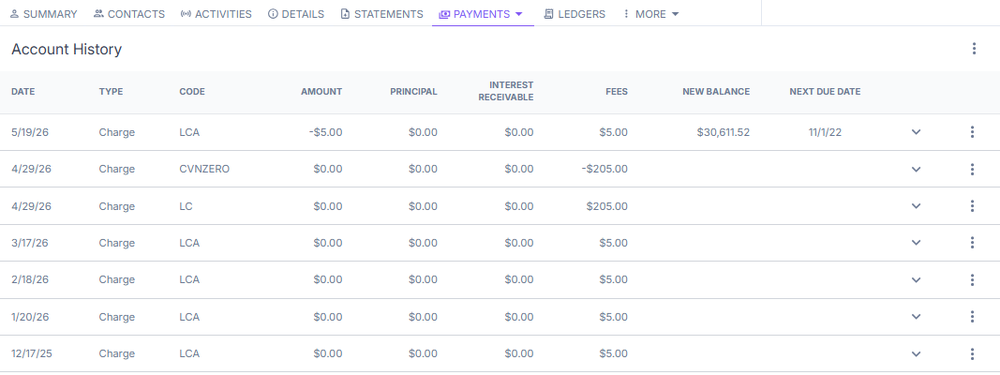
- Account history displays a full chronological record of all payments, adjustments, and account changes.
- Expand each entry to see which ledgers were affected by that payment.
Viewing a loan's current balance, interest rate, and terms
- Open the obligor's account and navigate to the Details tab.
- View the principal balance, payoff amount, daily interest/finance charge, interest rate, payment information, and full loan terms.
Viewing scheduled payments or due dates
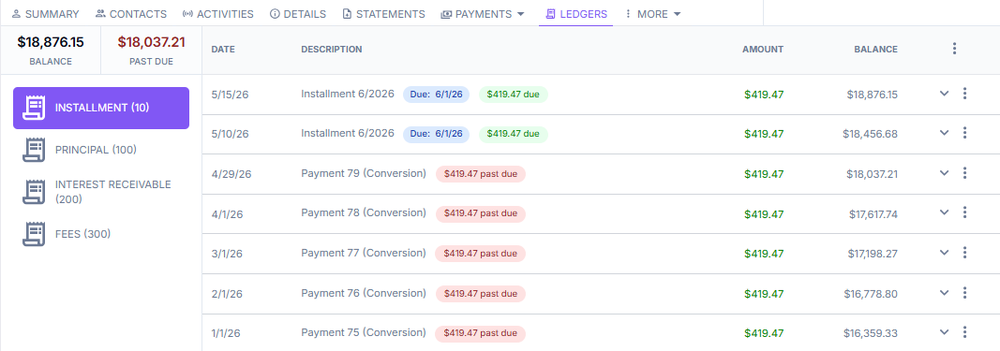
- Navigate to the Ledgers tab and open the installment ledger.
- View upcoming due dates and scheduled installments.
Adding a payment method
- Navigate to the customer's obligation and confirm the correct account by verifying the account number, name, and account details.
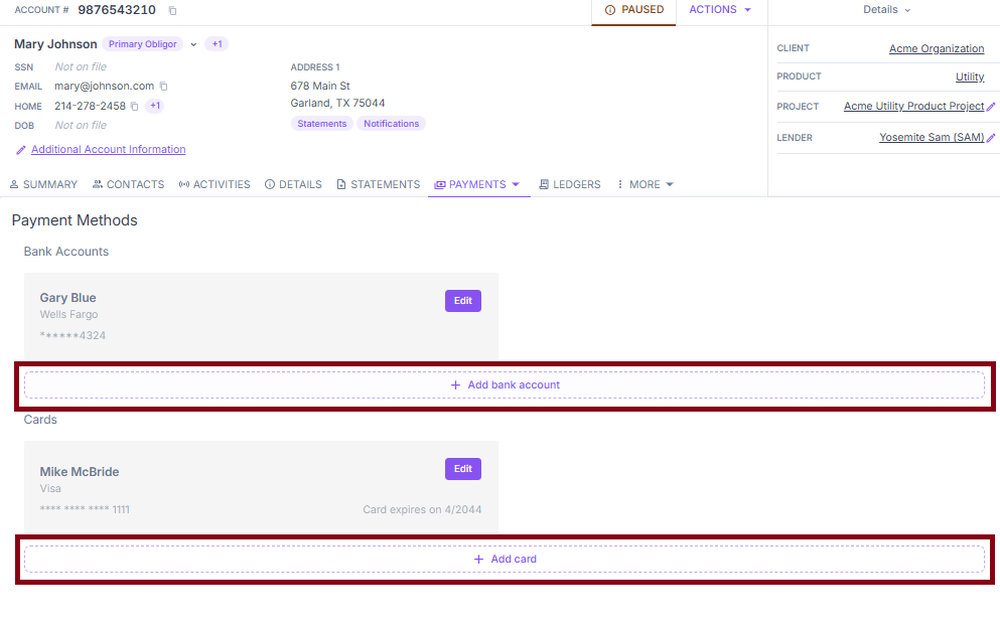
- Go to the Payments tab in the obligation's navigation bar.
- The Payment Methods page displays two sections: bank accounts (for ACH) and cards (for credit or debit). Availability is enabled or disabled per client.
- Add a bank account or credit card and save.
Autopay
Autopay enrollment is visible on the Summary and Payments tabs. If autopay is active, the payment schedule, amount, and payment method display here.
Lenders can restrict autopay to specific card types: debit only, credit only, or both. Only the card types enabled for autopay on this portfolio appear as options in the autopay enrollment flow. Cards already enrolled in autopay before a restriction is applied are grandfathered in and continue to draft normally. If an obligor asks why a specific card type is not available, verify the portfolio configuration before troubleshooting.
Setting up autopay
- Open the obligor's account and navigate to Autopay or Recurring Payments.
- Select Set Up Autopay or Enroll in Autopay.
- Choose a payment method type: checking account (ACH), debit card, or credit card. Only the card types enabled for autopay on this portfolio will appear as options.
- Confirm the monthly autopay amount and set the draft date. The draft date defaults to start on the next payment due date — this ensures autopay does not attempt to draft before the first upcoming payment is due.
- Review all details carefully, then select Save or Confirm to activate autopay.

Deactivating autopay
- Open the obligor's account and navigate to Autopay or Recurring Payments.
- Locate the active autopay enrollment and select Deactivate, Cancel Autopay, or Remove Autopay.
- Confirm the action when prompted and verify the autopay status now shows as inactive or cancelled.
- Document the account with the reason for deactivation.
Deactivating autopay does not cancel any currently scheduled upcoming payment. Confirm whether the next scheduled payment will still process and advise the obligor accordingly.
Accepting a payment
- Locate and open the customer's account and verify the obligor's identity.
- Navigate to Payments and select Make a Payment.
- Select the appropriate payment type and enter the payment details:
- Regular monthly payment: Select Regular Monthly Payment. The system pre-fills the standard monthly amount and includes any outstanding late fees. Confirm the payment method and effective date, then submit.
- Principal reduction: Select Principal Reduction and enter the extra principal amount. Confirm the payment method and effective date, then submit. This reduces the principal balance only — it does not count as a regular monthly payment.
- Payoff payment: Generate a payoff quote first, then select Payoff. Enter the exact payoff amount, confirm the effective date matches the quote date, confirm the payment method, and submit. Verify the account status updates to Paid Off.
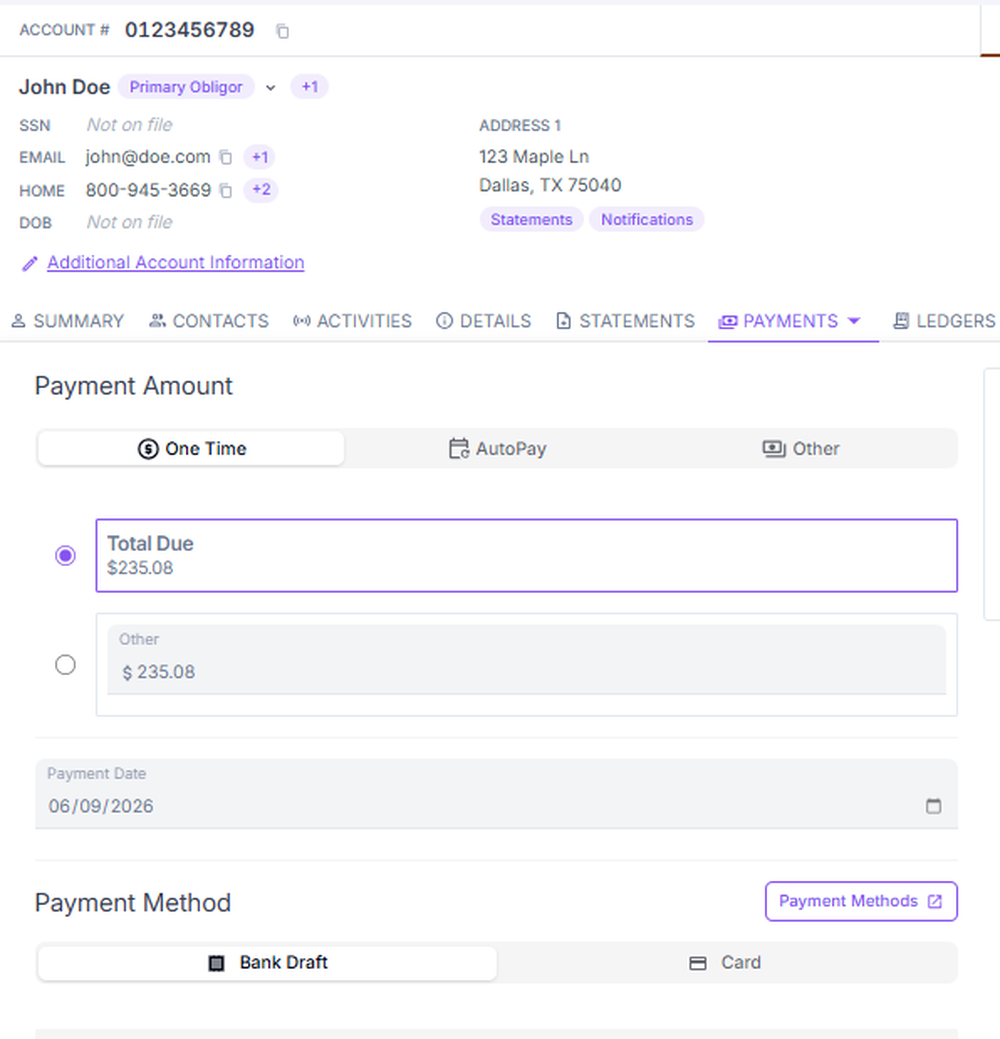
Always review the payment confirmation screen to verify that the correct amount was applied to the correct buckets — principal, interest, and fees.
Where sales tax applies, the applicable sales tax is now shown as a line item on the payment preview before the payment is submitted, so the obligor and agent can see the tax portion of the total.
Card payments authenticate through the Cybersource payment processor. Intermittent authentication failures caused by a processor-timing issue have been resolved — card failures now reflect actual declines, not timing glitches on the ConcordLink side.
Ebox payments
ConcordLink supports electronic lockbox (Ebox) payment processing. Ebox-originated payments are automatically assigned the correct payment channel in the system.
Viewing aggregated Ebox payments
Ebox payments can be viewed in an aggregated view that groups all Ebox-originated activity for a given period. Navigate to the Payments section and filter by payment channel to isolate Ebox transactions.
Posting Ebox straggler payments manually
Occasionally, Ebox payments that did not process in an automated batch run need to be posted manually in the agent portal.
- Navigate to the applicable obligation in the agent portal.
- Select Actions and choose Post Ebox Payment or the equivalent manual posting option.
- Enter the payment details, including amount, effective date, and payment channel.
- Confirm and save. The payment will be logged with the Ebox payment channel, consistent with automated postings.
ACH transfers
ConcordLink automatically creates ACH transfers for payments and refunds. This includes:
- Standard payment transfers — ACH transfers are created automatically when a payment is processed.
- Refund transfers — ACH transfers are created automatically when a refund is issued.
- Failed-debit transfers — when a debit attempt fails and the payment method does not permit re-attempts, a failed-debit ACH transfer is created automatically.
Transfer creation is consolidated — multiple events that would generate the same transfer are grouped into a single transfer record.
Obligor names on ACH files are automatically sanitized at file generation to strip characters that some receiving banks reject. This eliminates a common source of batch-level rejections. No configuration is required.
Non-cash refunds
ConcordLink supports issuing non-cash refunds via the Non-Cash Refunds Issued by Client refund option.
- Navigate to the obligor's account and select Actions.
- Select Issue Refund.
- Choose Non-Cash Refunds Issued by Client as the refund type.
- Enter the refund amount and any required notes.
- Confirm and save.
Stopping or reversing a payment
For the full step-by-step stopping/reversing procedure, as well as fee waivers, payoff quotes, refunds, and disputes, see Payment Actions — Fees, Payoffs, and Refunds.
If the payment has already settled with the bank, escalate to a supervisor.
Next: Continue to Payment Actions — Fees, Payoffs, and Refunds for fee waivers, payoff quotes, refunds, disputes, and the Actions menu.